Classroom Technology Guide
/https://siu.edu/search-results.php
Last Updated: Sep 08, 2026, 10:46 AM
- Technology plays an important role in creating engaging, effective learning experiences. The School of Education’s Classroom Technology Guide provides faculty with practical resources for using the technology available in School of Education classrooms. Explore the guides below for step-by-step instructions to help you get started, troubleshoot common issues, and make the most of our classroom technology.
Using a Laptop Computer
Wham 105
- Connect laptop computer to HDMI cable on podium.
- Power on Crestron control panel.
- Drag laptop icon to “Widescreen” area on Crestron display. -Laptop display image will appear on the projector screen.
- Unplug wireless microphone if connected to charger.
- Turn microphone power switch to “On.”
- Wireless microphone and wall mounted speakers may now be utilized for presentation.
- Adjust volume control slider on Crestron control panel display as needed.
- When finished, turn off Crestron control panel and disconnect laptop computer from HDMI connector.
Wham 112
- Plug in cable to either HDMI connectors located on wall receptacle below projector screen.
- Plug in cable to laptop computer. An adapter may be required if laptop is not equipped with necessary connection: USB-C → HDMI, VGA → HDMI.
- Power on the projector using blue button on remote control.
- Projector will automatically select active input; HDMI1 or HDMI2.
- When you are finished, turn off projector and laptop.
- Unplug HDMI (VGA) connector from laptop.
Wham 219
- Turn on laptop computer and projector.
- Projector automatically defaults to the podium computer.
- For external laptop:
- Plug in the HDMI cable to the laptop computer.
- On projector remote control press “HDMI” input (on bottom of remote control).
- If screen switch is required on laptop, press Ctrl and F8 simultaneously and select “Duplicate” display for the laptop image to appear on the projector screen.
- Turn off computer and projector when finished; unplug HDMI cable.
Wham 228
- On Windows laptop, press Ctrl and F8 to select output display. Select “Duplicate” from the available options.
- Plug HDMI cable into laptop computer (with adapter, if necessary).
- On the Crestron control panel:
- Turn touchpad on. Projector screens will extend to operating position.
- Select “Presentation,” on the left-hand menu.
- Drag and drop “Laptop” to “Left Presentation Screen.”
- Projector will automatically detect laptop display. Sound will be available through classroom speakers.
- When finished, shutdown Creston control; projector screens will retract. to stored position.
- Turn off projector; press blue button on projector remote control twice.
Wham 308
- On Windows laptop, press Ctrl and F8 to select output display. Select “Duplicate” from the available options.
- Locate HDMI cable on the left side of the podium.
- Plug the HDMI cable into laptop computer (using an HDMI to USB-C adapter, if necessary).
- Power on the projector by pressing the blue button located on the upper left corner of the projector remote. The projector will automatically connect to the laptop computer (HDMI 2).
- When finished, power off the projector by pressing the power button twice.
Generic Classroom
- Connect laptop computer to podium HDMI (USB) or VGA, depending upon the connections available. (If VGA on laptop a VGA to HDMI adapter will be required. The podiums after latest update no longer have VGA connectors.)
- Turn on the Crestron control panel by pressing the “Power On” button. The power light will blink repeatedly, and the projector will start.
- Turn on the laptop computer.
- The Crestron control panel will automatically detect and select the active input. There is no need to select the input from the control panel, i.e., HDMI, VGA.
- When finished, shut down the laptop.
- Press the “Power Off" button on the Crestron control panel.</li.
- Disconnect the HDMI (USB), VGA connector (and adapter if used).
Using a Desktop Computer
Wham 105
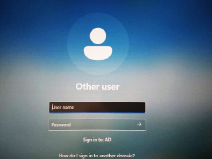
- To log in, you must have your SIU email or campus network ID (“SIU” plus your Dawgtag) and corresponding password. (Figure 1)
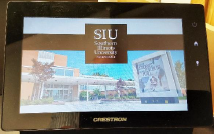
- Turn on the Crestron display by pressing the power button in the upper right corner of the screen. (Figure 2)
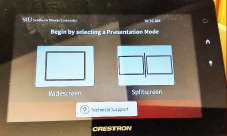
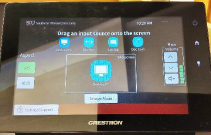
- Select “Widescreen” for the Presentation Mode. (Figure 3) Select the input source, Desktop PC, by dragging the icon into the widescreen frame. (Figure 4) The computer screen will appear on the projector. To momentarily suspend the projector display, click the “Image Mute” button. The overall sound level from the auditorium speakers is controlled by the “Main Volume” buttons.
- Log in to Zoom using a web browser or the Workplace app and then select the scheduled meeting from the list.
Figure 1
Figure 2
Figure 3
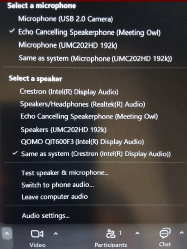
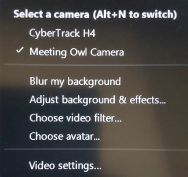
Figure 4- In the Zoom meeting, select the following devices that are checked in the figures: (Figure 5 and Figure 6)
- Microphone: ✔ Echo Canceling Speakerphone (Meeting Owl)
- Speakers: ✔ Same as system (Crestron (Intel(R) Display Audio))
- Camera: ✔ Meeting Owl Camera
- To test the microphone used for the Zoom meeting and verify it is working, look for movement in the audio level meter. (Figure 7) The presenter will use a lapel microphone for the auditorium speakers.
Figure 5
Figure 6
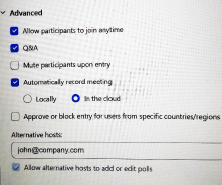
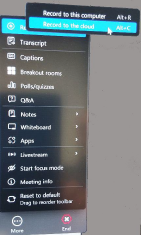
Figure 7- To record the meeting, select this option under the Advanced settings (Figure 8) or from the menu once the meeting has started. (Figure 9)
Figure 8
Figure 9
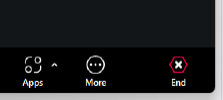
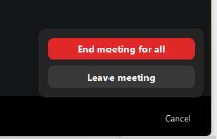
Figure 10- Clicking the End button located in the lower right corner of the screen (Figure 10) will present two options: either “End the meeting for all” or “Leave meeting” to enable other attendees to remain and continue the meeting. (Figure 11)
Figure 10
Figure 11Wham 228
- On the Crestron control panel:
- Drag “PC Primary” icon on Crestron display to “Left Presentation Screen.”
- Leave “Right Presentation Screen” blank.
- Projector will automatically detect and display image appearing on left podium computer monitor. Right monitor will be blank. Sound will be available through classroom speakers.
Wham 308
- On the desktop (podium) computer, log in using your SIU email and password.
- Power on the projector by pressing the blue button located on the upper left corner of the remote. The projector will automatically connect (HDMI 1).
- When finished, power off the projector by pressing the power button twice.